|
An E-mail message that uses a Table for
the HTML design and includes pictures and SmartArt.
Complete the Practice
Activity on page 112.
Review the Test questions on page 112.
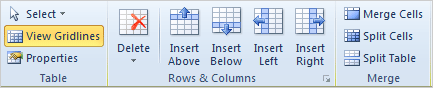
More Menu MapsFrom the Table Tools 1. Table Tools ->Layout->Merge->Merge Cells, page 92 2. Table Tools ->Design->Table Styles->Borders, page 100
From the Attachment Tools 1. Attachment Tools ->Attachments, page 103 1. Attachment Tools->Attachments->Save As, page 104 Menu MapsFrom the Insert Ribbon. 1. Insert ->Include->Attach File, page 88 2. Insert ->Tables->Table, page 91 3. Insert ->Illustrations->SmartArt, page 93
From the Home Ribbon 1. Home ->Respond->Forward, page 105 2. Home ->Respond->More, page 106 |
|

|
|

